Workspace setup | Minecraft 1.19
Published on
11 min read
Part 1 of 5
In this first part of my Minecraft 1.19 modding tutorial series, we will learn how to setup a workspace for your new mod.
Pre-requisites
In order to get started you will be required to download and install Java JDK 17+ and IntelliJ (an IDE). I will be using IntelliJ (community edition) as it is free and also very good; you can use another IDE if you wish, however it will not be covered in this tutorial series.
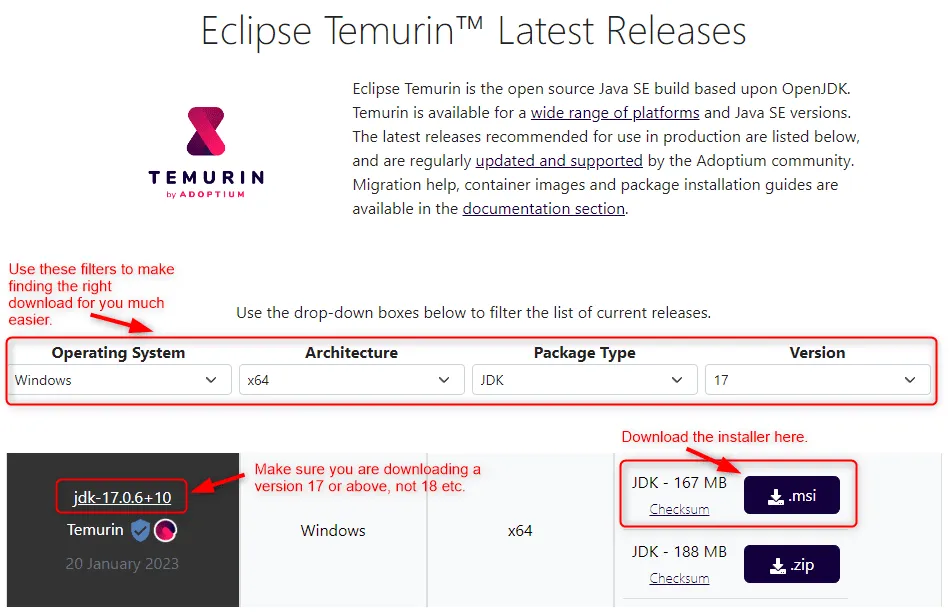
Firstly please download and install Java JDK from here, use the filters to make finding the right download for you easier. In my case version 17 of the x64 JDK for Windows.
Secondly please download and install IntelliJ from here, you can use either the Ultimate or Community Edition. I will be using the community edition throughout this tutorial.

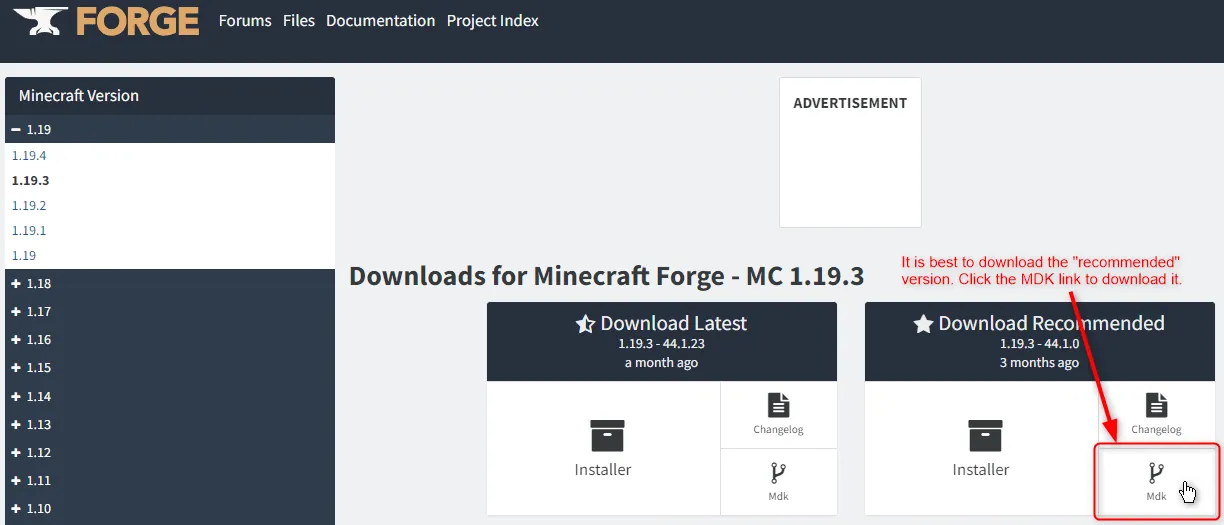
Lastly before we can begin setting up the workspace, we need to download the latest recommended MDK (mod development kit) from Minecraft Forge. Please go to here and download the recommended MDK for MC 1.19.3 (at the time of writing there is no recommended MDK above version 1.19.3). Ideally you will want to use recommended MDK, opposed to the latest one, where possible as it is more likely to work correctly.
Note that when you click to download the MDK, you may be redirected to a page with ads, please avoid clicking on any of them (even if they look like popups from your OS) and wait a few seconds for the skip button to appear at the top right corner.
Setting up the workspace
Now that you’ve got the pre-requisites in place, lets begin creation of the new mod workspace. Firstly, we need to extract the downloaded MDK into the location you want your mod to be on your machine. In my case I’ve extracted it into a folder at D:\Code\Personal\GitHub\mc-1.19-modding-tutorial. Usually this folder would be the name of your mod.
Once you have done this, you can delete the following files from the folder:
- changelog.txt
- CREDITS.txt
- LICENSE.txt
- README.txt
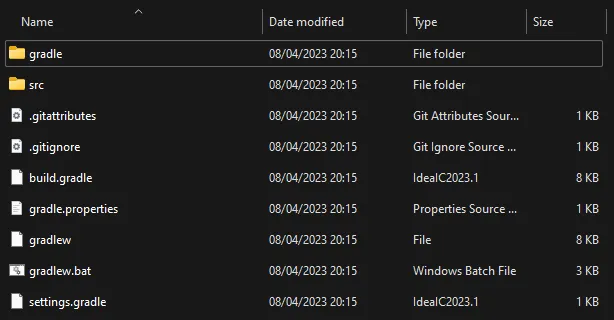
Your folder structure should look something like this once you have done that:
Now you can launch IntelliJ and click ‘Open a project’, when asked, select the mod folder you’ve just created that contains the mod MDK files. If this is the first time you have launched IntelliJ, it may as you to choose some settings. For the most part the defaults should be fine, however I would recommend choosing the dark theme as it’s a little easier on the eyes and you’ll be staring at it for quite some time throughout this tutorial series.
Upon opening the project, it may ask you if you wish to trust and open the project, you will want to click the trust button at this point.
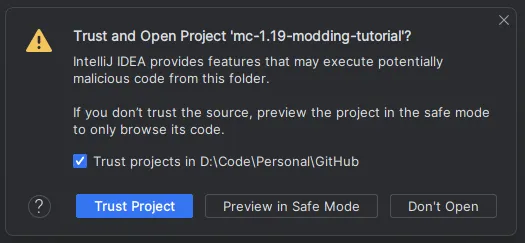
Once the project has opened it may begin some initial Gradle tasks, these should be indicated at the bottom right of the application. I would suggest waiting for that to finish before continuing.
![]()
There are now a couple of settings we need to double check and possibly change in the application before we start diving into modifying some of the MDK files we downloaded.
Firstly, we need to update the Gradle JVM to use the Project SDK (which should be 17). We do this by opening the application settings from the file menu, going down through Build, Execution, Deployment -> Build Tools -> Gradle and setting the Gradle JVM option at the very bottom to Project SDK.
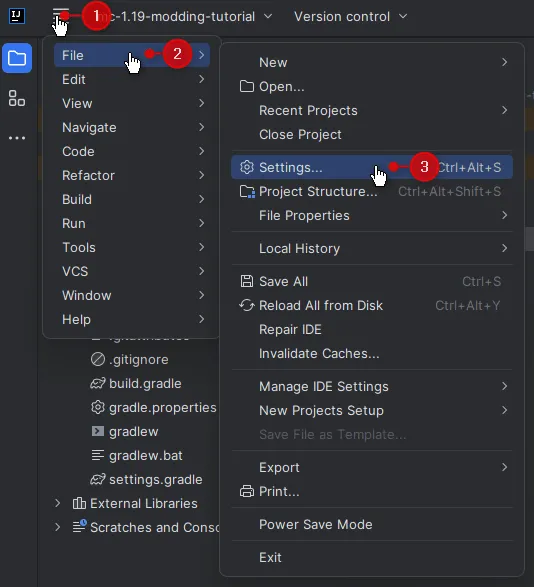
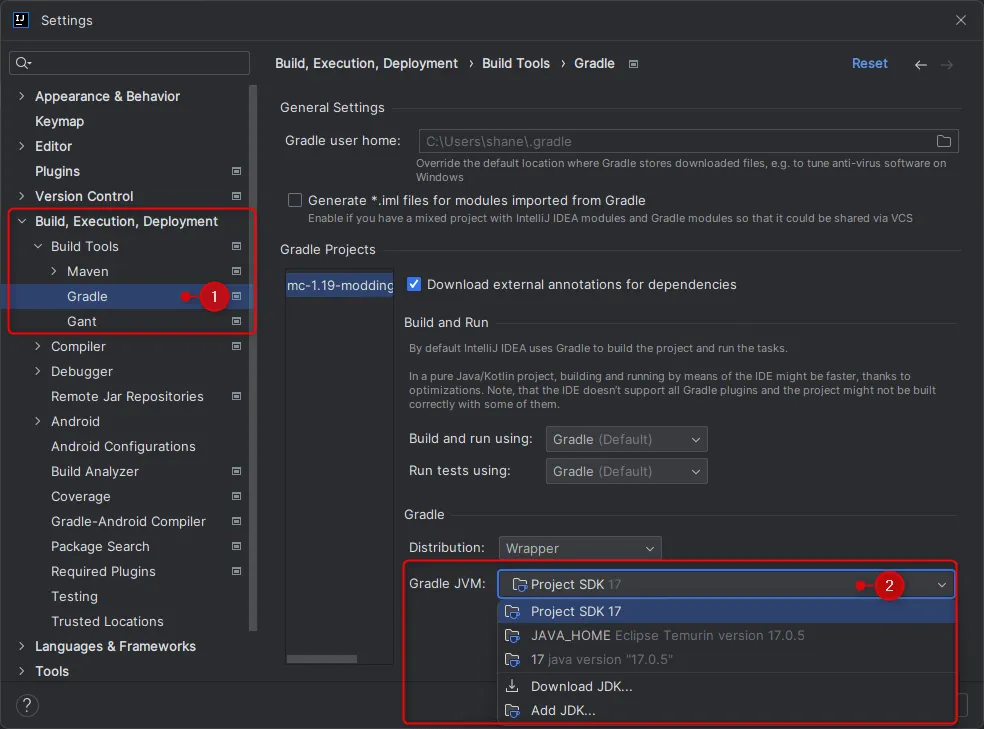
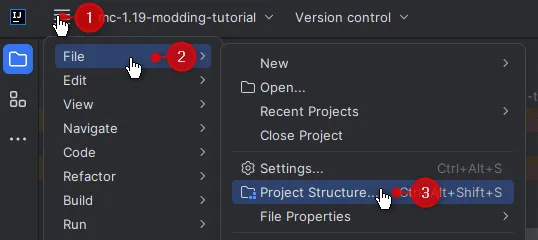
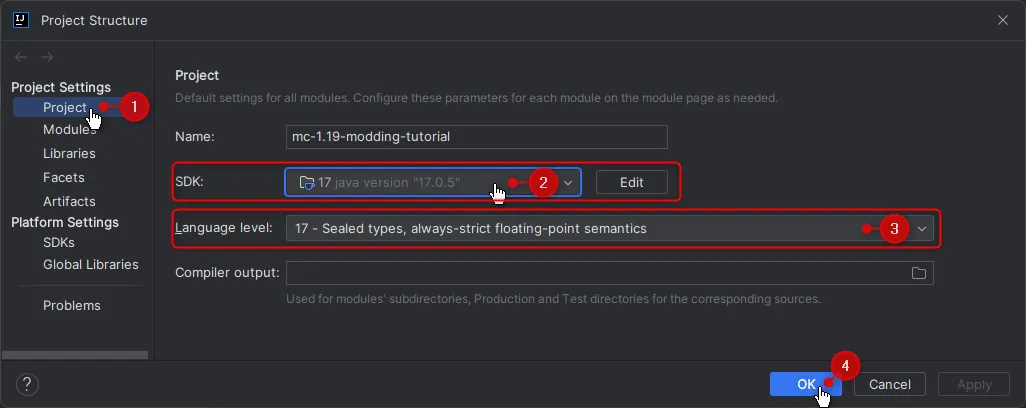
Then secondly we need to check that the project settings is using the right SDK and language level. You can get to the project settings but clicking the Project Structure option on the file menu and then click on the Project option from the left side in the modal that pops up. On the modal, make sure that Java version 17 is selected for the SDK and that the language level is also using Java 17 also.
Mod setup
Now that we’ve got the new mod folder structure in place, application and project settings sorted in IntelliJ, we can finally do the initial mod setup and then wrap up this part of the tutorial.
In the project explorer on the left, expand the src/main/java folder, in there right click on com.example.examplemod and choose refactor -> rename to change your mod package name to something unique that will not conflict with other mods. Usually the convention for package names in Java is based on a reversed domain name that you own. If you do not own a domain but are planning to store your mod source code in a GitHub repository (recommended), then you can use your GitHub profile URL for this.
For example, this tutorial mod is going to be stored in GitHub under my user with the URL https://github.com/ShaneYu/. Taking the Java package naming convention previously mentioned, this would become something like com.github.shaneyu.tutorialmod. Make sure there are no spaces, capital letters or special characters.
After that, in the project explorer again, right click the file ExampleMod and rename it in the same way as above to your mod name, in my case TutorialMod. Usually this is the last part of your package name too, but in pascal case.
Here is what my project explorer looks like after renaming those couple of things:
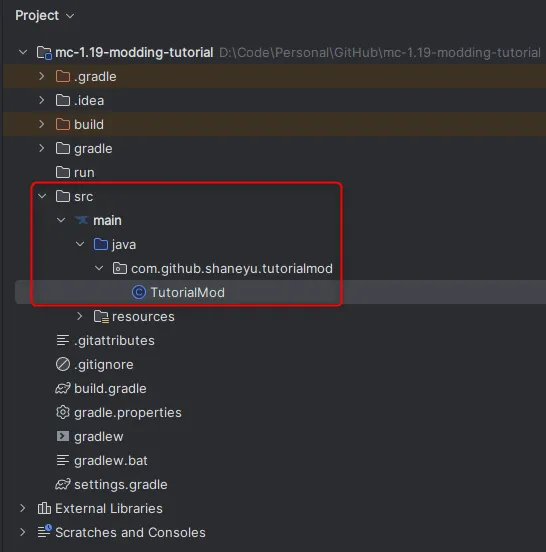
Now open up the TutorialMod file by double left checking it in the project explorer. There is a lot of content in this file that we just don’tt need at all or not right now, so we’re going to clean it up. Strip out all of the code until your file content looks like mine below:
package com.github.shaneyu.tutorialmod;

import com.mojang.logging.LogUtils;
import net.minecraftforge.api.distmarker.Dist;
import net.minecraftforge.common.MinecraftForge;
import net.minecraftforge.event.CreativeModeTabEvent;
import net.minecraftforge.eventbus.api.IEventBus;
import net.minecraftforge.eventbus.api.SubscribeEvent;
import net.minecraftforge.fml.common.Mod;
import net.minecraftforge.fml.event.lifecycle.FMLClientSetupEvent;
import net.minecraftforge.fml.event.lifecycle.FMLCommonSetupEvent;
import net.minecraftforge.fml.javafmlmod.FMLJavaModLoadingContext;
import org.slf4j.Logger;

@Mod(TutorialMod.MODID)
public class TutorialMod
{
    public static final String MODID = "examplemod";
    private static final Logger LOGGER = LogUtils.getLogger();

    public TutorialMod()
    {
        IEventBus modEventBus = FMLJavaModLoadingContext.get().getModEventBus();

        modEventBus.addListener(this::commonSetup);
        MinecraftForge.EVENT_BUS.register(this);

        modEventBus.addListener(this::addCreative);
    }

    private void commonSetup(final FMLCommonSetupEvent event) {
    }

    private void addCreative(CreativeModeTabEvent.BuildContents event) {
    }

    @Mod.EventBusSubscriber(modid = MODID, bus = Mod.EventBusSubscriber.Bus.MOD, value = Dist.CLIENT)
    public static class ClientModEvents
    {
        @SubscribeEvent
        public static void onClientSetup(FMLClientSetupEvent event) {
        }
    }
}
Next we need to change the value of MODID to our mod id, this should always be lower case, no spaces or special characters except for underscore _ and hyphen -. In our case we’re going to set it to tutorialmod which is the same name we used when renaming the folders and files above.
public static final String MODID = "tutorialmod";Last thing to change in this file is to make the LOGGER public so that we can use this logger later on throughout our mod code, just change the modifier private to public like so:
public static final Logger LOGGER = LogUtils.getLogger();Make sure to save the file, that is all we need to do in this file for now. Next we need to modify a file called mods.toml which containers information about our mod, it’s dependencies to Forge, Minecraft and possibly other mods too.
In project explorer, expand src/main/resources/META-INF/, in here there should be a mods.toml file, double click to open it. Don’t be daunted by the contents of this file, there is a lot in there. We only need to change a handful of things in this file, however you can change some of the other things if you want to, just read the comments about what each thing is for.
The following ones must be updated, using our mod id mentioned above etc:
modId="tutorialmod" #mandatory
version="1.0.0-1.19" #mandatory
displayName="Tutorial Mod" #mandatory
...
[[dependencies.tutorialmod]]
...
[[dependencies.tutorialmod]]
...
As part of updating the mods.toml I have modified some other values, cleaned up the comments and removed anything I didn’t need/want like so:
modLoader="javafml"
loaderVersion="[44,)"
license="MIT"
issueTrackerURL="https://github.com/ShaneYu/mc-1.19-modding-tutorial/issues"
[[mods]]
modId="tutorialmod"
version="1.0.0-1.19"
displayName="Tutorial Mod"
displayURL="https://staging.shaneyu.com/blog/post/minecraft-1-19-modding-tutorial"
logoFile="tutorialmod.png"
authors="Shane Yu (ShadowLoop)"

# A URL to query for updates for this mod. See the JSON update specification https://docs.minecraftforge.net/en/latest/misc/updatechecker/
#updateJSONURL="https://change.me.example.invalid/updates.json" #optional

description='''
This is a mod being built up as part of my Minecraft 1.19 modding tutorial series.
'''

[[dependencies.tutorialmod]]
    modId="forge"
    mandatory=true
    versionRange="[44,)"
    ordering="NONE"
    side="BOTH"
[[dependencies.tutorialmod]]
    modId="minecraft"
    mandatory=true
    versionRange="[1.19.3,1.20)"
    ordering="NONE"
    side="BOTH"
The last thing we need to do is update the Gradle build file as there are several references to the old mod name and a handful of other things we need to update. Open up the build.gradle file within the project explorer:
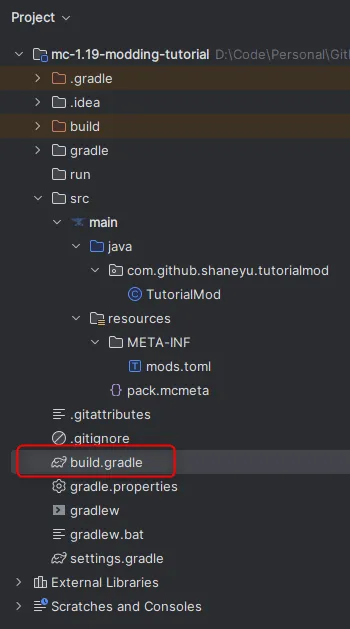
First start by changing the three properties at the top of the file like so:
version = '1.0.0-1.19'
group = 'com.github.shaneyu.tutorialmod'
archivesBaseName = 'tutorialmod'
Here we set the archivesBaseName to the mod id we used earlier, the group to the package name we used earlier and same for the version. After you have done this, do a find and replace examplemod for tutorialmod; this can be found under Edit -> Find -> Replace. (or press the keyboard shortcut ctrl + r).


Using ParchmentMC
ParchmentMC mappings seem to be a bit nicer than the official forge ones that are setup be default in the MDK, let’s switch over to use parchment instead.
Go to here and check what the latest Mapping Version is for the Minecraft Version your mod is being built with. In our case, we are using Minecraft 1.19.3 and the latest mapping version at the time of writing this is v2023.03.12.
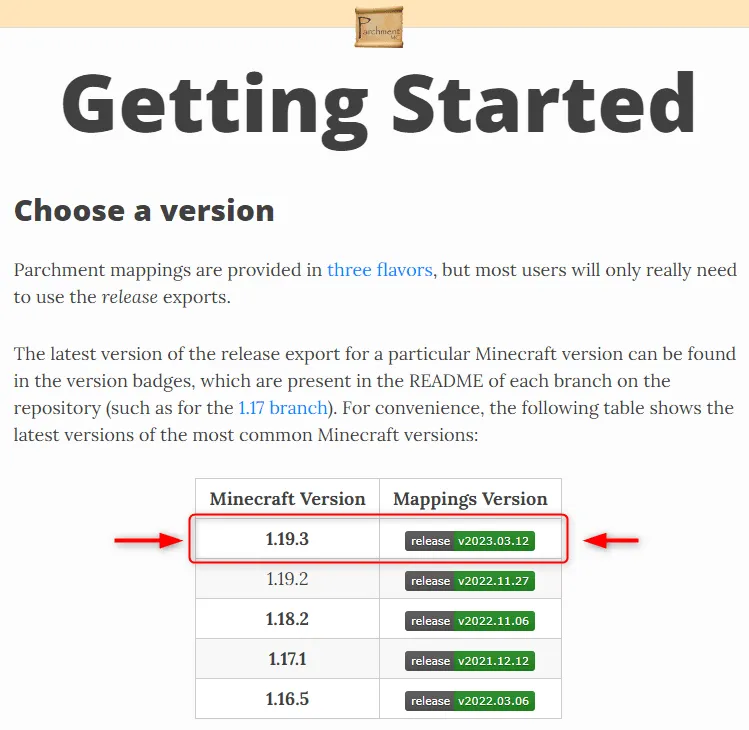
Copy the following line into your build.gradle file in the plugins section at the top of the file, it must be pasted below the one for net.minecraftforge.gradle. Like so:
plugins {
    id 'eclipse'
    id 'maven-publish'
    id 'net.minecraftforge.gradle' version '5.1.+'
    id 'org.parchmentmc.librarian.forgegradle' version '1.+'
}
Go down a little further to find the line mappings channel: 'official', version: '1.19.3', we need to modify this line so that the mapping chanel is parchment and the version is the Mapping Version we found on the Parchment MC website, but without the v and includes the Minecraft versions separated by a hyphen like so:
mappings channel: 'parchment', version: '2023.03.12-1.19.3'Make sure to save the file and then open up the file settings.gradle from the project explorer and paste in maven { url = 'https://maven.parchmentmc.org' } into the repositories section like so:
pluginManagement {
    repositories {
        gradlePluginPortal()
        maven { url = 'https://maven.minecraftforge.net/' }
        maven { url = 'https://maven.parchmentmc.org' }
    }
}
Save the file and then click the Load gradle changes button that will have appeared at the top right side of the application.
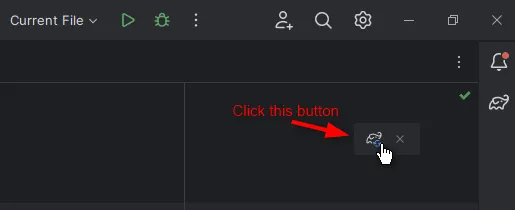
It will indicate at the bottom right of the application that Gradle is downloading what it needs and performing various other tasks, please wait for them to finish before continuing.
Running the mod
Let’s run the mod and check that everything has worked and that our mod workspace is now fully setup and ready to go for the rest of this tutorial series.
To make running Minecraft with your mod loaded, including debugging and data generation later on, we can make use of some build/run configurations that Gradle can generate for us. Click the Gradle icon on the far right hand side to open up the Gradle window and from here expand down into Tasks -> forgegradle runs and double click the item named genIntelliJRuns.
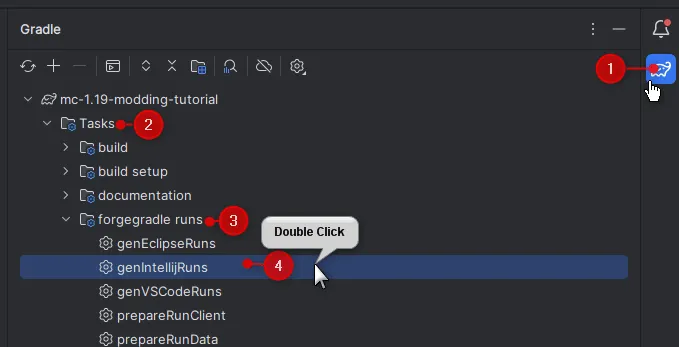
Double clicking that item will cause Gradle to generate those configurations I spoke about before, this could take a minute to run and you should see success in the terminal the bottom of the screen once it is complete.

Finally…let’s run the game but choosing the runClient configuration from the top right of the application and then click the bug green play button.

It can take a while the first time you run your mod as it may need to download assets required to run Minecraft etc, please be patient for this to complete, it should be faster next time. With any luck an instance of the Minecraft game should be loaded up and you should be able to see your mod loaded with the version we specified and any of the other details you changed in the mods.toml file.
Once loaded you can see in the title bar what version of Minecraft is running and in the bottom left the number of mods loaded. Minecraft and Forge are always loaded, so with your new mod, we’d expect 3 mods to be loaded at this point.
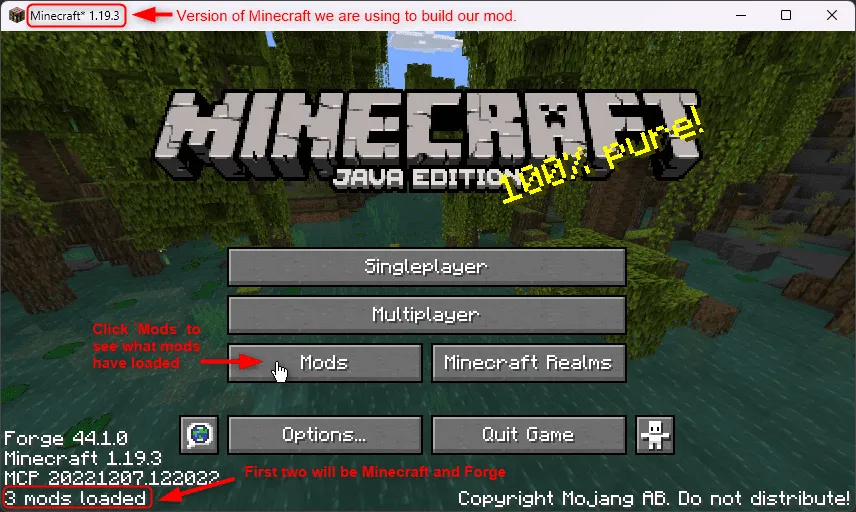
If you click on the mods button, we can dig into what mods are loaded and the details about them. Click on your mod from the list and see it’s details presented on the right, this should reflect information you’ve entered into the mods.toml file earlier.
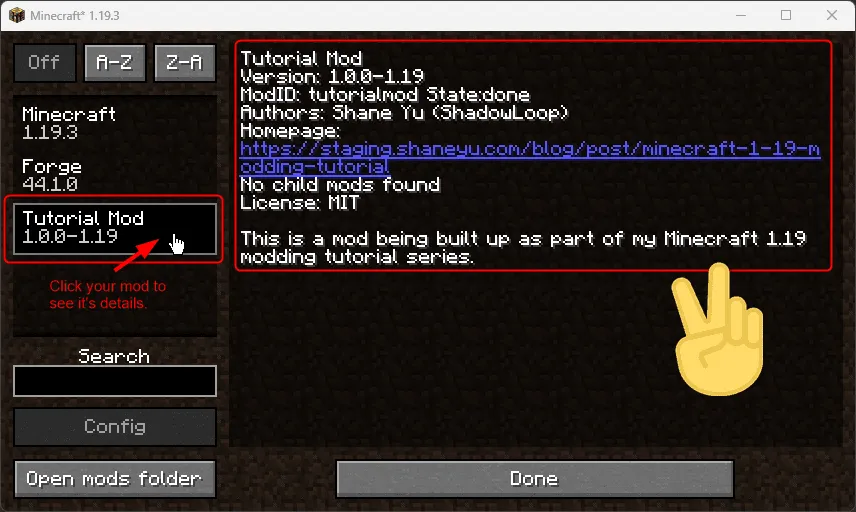
Thanks for getting to this point, by now we have created our new mod workspace and are prepared for the rest of the tutorial where we will look at creating new items, blocks and more.
You can see the final state of the mod, as of the end of this part, by going to my GitHub repository.
Parts in this series
Below are all of the other parts of this tutorial series.
Workspace setup
Learn how to setup your workspace for your new Minecraft 1.19 mod, using Forge, Java 17 and IntelliJ community.
Basic items
Learn how to create your very first basic items that will be used in future parts of this tutorial series.
Basic Blocks
Learn how to create your very first basic blocks that will be used in future parts of this tutorial series.
Data generators
Learn how to use data generators to automatically create your mod assets to avoid having to hand crank them each time.
Loot tables & tags
Learn how to drop one or more items when mining your blocks with loot tables and tags.
Share on social media platforms.
