Data generators | Minecraft 1.19
Published on
9 min read
Part 4 of 5
Up until now we have had to hand crank each of the assets required for our mod items and blocks. Whilst it’s not too difficult to do, it can become very tiresome and it’s very easy to make tiny little mistakes that cause time to track down and fix.
Most tutorials would likely show you many other things such as advanced items and ore generation etc before getting to data generators, however I think that it’s easier to get it setup nearer the start and keep building on it as we go, rather than replacing all of the assets later on.
In this tutorial we will create a handful of different data generators to automatically generate various assets such as the blockstates, models and language JSON files etc.
Data generators
Data generators are a way to programmatically generate the assets and data of mods. It allows the definition of the contents of these files in the code and their automatic generation, without worrying about the specifics.
Data providers are the classes that actually define what data will be generated and provided. All data providers implement DataProvider. Minecraft has abstract implementations for most assets and data, so modders need only to extend and override the specified method.
There are two types of data generators, those that generate and provide client side assets (only used by the client) and those that generate server data (used by both client and server). Client assets are usually related to visuals such as models, textures, languages and sounds etc and are not needed by the server. Server data is usually related to what and how something should behave, for example loot tables that tell the server what items should be dropped when a block is mined, or what recipes are available for crafting.
As you can imagine, data such as recipes is required by the server and client so they both know what ingredients are need and what it produces, where as a block’s model it only important to the client which will visually see it.
Data generation
In order for our data generation to take place we need to create a main data generator class that will subscribe to a gatherData event and run each of our data providers. This class will add all our providers and decide whether they should be included for server and/or client data generation.
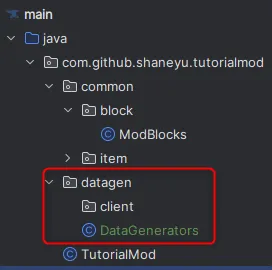
Let’s start by creating a datagen folder structure for our providers to live in. Withing our mod package, along side the common package that contains all of our code thus far, add a new package called datagen and below that create a client package.
Within the datagen package, create a new java class called DataGenerators and use the following content:
@Mod.EventBusSubscriber(modid = TutorialMod.MODID, bus = Mod.EventBusSubscriber.Bus.MOD)
public class DataGenerators {
    @SubscribeEvent
    public static void gatherData(GatherDataEvent event) {
        DataGenerator generator = event.getGenerator();
        ExistingFileHelper existingFileHelper = event.getExistingFileHelper();
        final var packOutput = generator.getPackOutput();
        final var lookupProvider = event.getLookupProvider();

        if (event.includeClient()) {

        }

        if (event.includeServer()) {

        }
    }
}
Item model provider
The item model provider will generate all those JSON files you previously created by hand under the assets/tutorialmod/models/item folder. Let’s create a new java class called ModItemModelProvider under the datagen/client package and add the following code:
public class ModItemModelProvider extends ItemModelProvider {
    public ModItemModelProvider(PackOutput packOutput, ExistingFileHelper existingFileHelper) {
        super(packOutput, TutorialMod.MODID, existingFileHelper);
    }

    @Override
    protected void registerModels() {

    }

    private String getItemName(RegistryObject<Item> item) {
        return item.getId().getPath();
    }

    private ResourceLocation getItemTexture(String itemName) {
        return new ResourceLocation(TutorialMod.MODID,"item/" + itemName);
    }

    private ItemModelBuilder simpleItem(RegistryObject<Item> item) {
        String itemPath = getItemName(item);

        return withExistingParent(itemPath, "item/generated").texture("layer0", getItemTexture(itemPath));
    }

    private ItemModelBuilder handheldItem(RegistryObject<Item> item) {
        String itemPath = getItemName(item);

        return withExistingParent(itemPath, "item/handheld").texture("layer0", getItemTexture(itemPath));

    }
}
The registerModels method is the main method which should register all of our models and will be called by the data generator. This method is added and handled by the class our class is inheriting called ItemModelProvider from net.minecraftforge.client.model.generators.ItemModelProvider. All the other methods are helper methods which we will be using to register our items, for now we will not be using the handheldItem method yet, that is there for a future tutorial.
All of our items thus far are just basic items, so we can make use of the simpleItem helper method to register each one of them. Add the following code to the registerModels method:
simpleItem(ModItems.COAL_DUST);
simpleItem(ModItems.IRON_DUST);
simpleItem(ModItems.STEEL_DUST);
simpleItem(ModItems.STEEL_INGOT);
Now go back into our main DataGenerators class and add the following line into the client if statement like so:
if (event.includeClient()) {
    generator.addProvider(true, new ModItemModelProvider(packOutput, existingFileHelper));
}
Now that we have done that, our ModItemModelProvider will be ran whenever the gatherData event is fired and should include client asset generation. Before we continue onto the block state provider, lets confirm that this provider is working correctly.
In order to safely run the data generation and avoid errors, we need to delete the models/item folder from our assets folder. If you don’t you may experience issues whereby it complains about duplicate JSON files and will fail to complete the full data generation. Here is an example of such an error that could occur:

After that, at the top right where we usually run the game, choose runData from the dropdown and then click the green play icon. This will build and run the game but it will not bring up a instance of the game, it will only run our data generation by firing the gatherData event.
![]()
Assuming all ran successfully, you should see in the terminal that the process had finished with exit code 0, meaning it didn’t fail. If you look further up the log you can see what providers have been ran, you should see one similar to this [main/INFO] [minecraft/DataGenerator]: Item Models: tutorialmod finished after xx ms.

If you expand the src/generated folders in the project explorer you can find all of the assets and data files that have been generated by your data generators/providers.
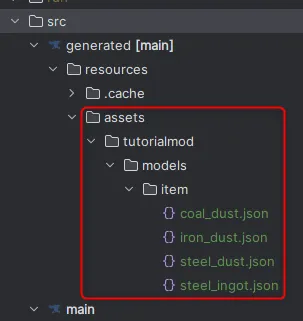
If you open on of those model JSON files, such as the coal_dust.json you will find the contents match exactly what we used when we hand cranked the file in the resources folder previously.
{
  "parent": "minecraft:item/generated",
  "textures": {
    "layer0": "tutorialmod:item/coal_dust"
  }
}
Block state provider
The block state provider will not only replace the block state JSON files that we created previously, but also the block item model JSON files also. Let’s start by creating a new file under the datagen/client package called ModBlockStateProvider with the following starting content:
public class ModBlockStateProvider extends BlockStateProvider {
    public ModBlockStateProvider(PackOutput packOutput, ExistingFileHelper existingFileHelper) {
        super(packOutput, TutorialMod.MODID, existingFileHelper);
    }

    @Override
    protected void registerStatesAndModels() {

    }

    private void simpleBlockWithItem(RegistryObject<Block> block) {
        String blockName = getBlockName(block);

        simpleBlock(block.get());
        itemModels().withExistingParent(blockName, new ResourceLocation(TutorialMod.MODID, "block/" + blockName));
    }

    private void horizontalBlockWithItem(RegistryObject<Block> block) {
        String blockName = getBlockName(block);

        horizontalBlock(block.get(), models().getExistingFile(new ResourceLocation(TutorialMod.MODID, "block/" + blockName)));
        itemModels().withExistingParent(blockName, new ResourceLocation(TutorialMod.MODID, "block/" + blockName));
    }

    private String getBlockName(RegistryObject<Block> block) {
        return block.getId().getPath();
    }
}
Just like the other item model provider, this provider has a main registration method registerStatesAndModels that is called when data generation occurs and this provider is used. Again we have several helper methods that we will be using to register our block states and models etc.
All of our blocks thus far are just basic blocks, so we can make use of the simpleBlockWithItem helper method to register each one of them. As the helper method suggests, it will register the block and it’s block item.
Add the following code to the registerStatesAndModels method:
simpleBlockWithItem(ModBlocks.COAL_INFUSED_IRON_ORE);
simpleBlockWithItem(ModBlocks.STEEL_BLOCK);
simpleBlockWithItem(ModBlocks.IRON_FRAME);
simpleBlockWithItem(ModBlocks.STEEL_FRAME);
Now go back into our main DataGenerators class and add the following line into the client if statement like so:
if (event.includeClient()) {
    ...
    generator.addProvider(true, new ModBlockStateProvider(packOutput, existingFileHelper));
}
With this line in place our block state provider will now be used whenever the gatherData event is fired as part of data generation. As with the item provider, we need to delete the existing assets that are about to be generated, therefore you should now delete the models/block and blockstates folders under the assets folder.
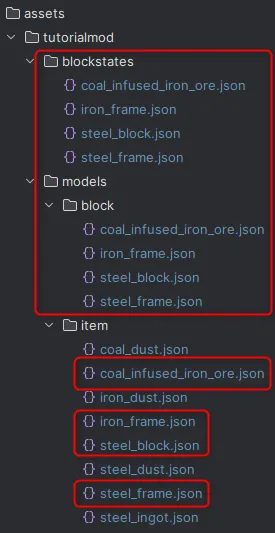
At this point you can run the data generation again and it should succeed. If you inspect the generation folder you should see the new files and they should look the same as they did before when we hand crafted them.
Language provider
Although the language file is relatively simple to maintain by hand, using a language provider using code we will be able to make things even easier and potentially add more advanced generation to it in the future.
Create a new ModLanguageProvider class in the datagen/client package with the following starting content:
public class ModLanguageProvider extends LanguageProvider {
    public ModLanguageProvider(PackOutput packOutput) {
        super(packOutput, TutorialMod.MODID, "en_us");
    }

    @Override
    protected void addTranslations() {

    }
}
All our translations will be added via the addTranslations method that will be called when the gatherData event is fired, just like the other providers. Let’s add our translations from the previous tutorials using this new language provider:
add("creativemodetab.tutorialmod_tab", "Tutorial Mod");
add(ModItems.COAL_DUST.get(), "Coal Dust");
add(ModItems.IRON_DUST.get(), "Iron Dust");
add(ModItems.STEEL_DUST.get(), "Steel Dust");
add(ModBlocks.COAL_INFUSED_IRON_ORE.get(), "Coal Infused Iron Ore");
add(ModBlocks.STEEL_BLOCK.get(), "Block of Steel");
add(ModBlocks.IRON_FRAME.get(), "Iron Frame");
add(ModBlocks.STEEL_FRAME.get(), "Steel Frame");
Now switch back to the main DataGenerators class and once again add the following line to the client section like so:
if (event.includeClient()) {
    ...
    generator.addProvider(true, new ModLanguageProvider(packOutput));
}
Remember to delete the existing lang en_us.json file that we created under the assets folder as we’re about to generate it. Then run the data generation again to see the final result.
Remaining assets
Data generators has meant that we are now generating all of our block/item models, block states and translations rather than hand crafting them. This is especially good as it eliminates the potential silly little issues like typos etc that is easy to make and means that we can instead use code to define them - and code is good right!
Although we’ve manage to automate all of these assets now, we still need to supply the texture PNG image files for the blocks and items to use. By this point then, you should have only a textures folder within your assets folder which contains the same PNG images as before.
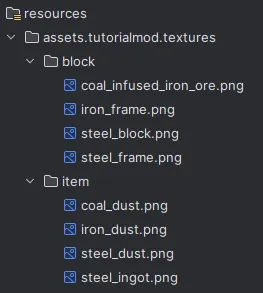
Running the game
Running the game should work just as it did at the end of the previous tutorial, however this time using generated assets opposed to hand crafted ones that are prone to silly errors like typos.
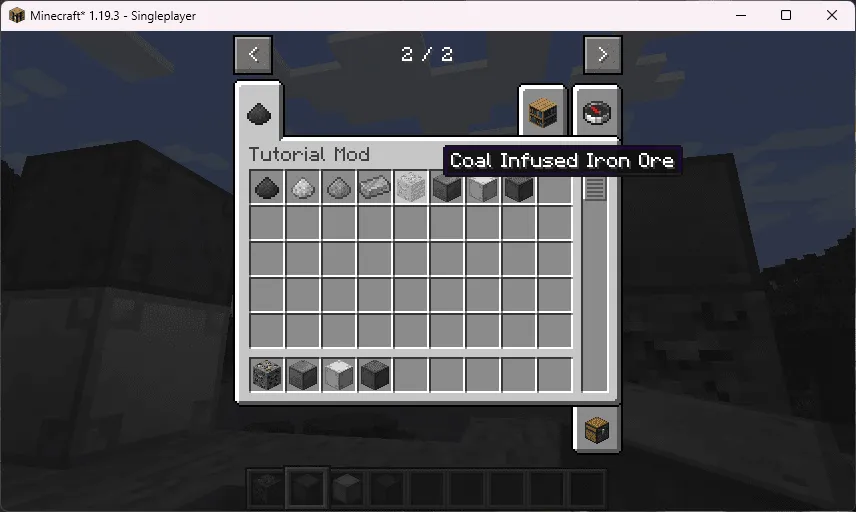
You can see the final state of the mod, as of the end of this tutorial, by going to my GitHub repository.
Parts in this series
Below are all of the other parts of this tutorial series.
Workspace setup
Learn how to setup your workspace for your new Minecraft 1.19 mod, using Forge, Java 17 and IntelliJ community.
Basic items
Learn how to create your very first basic items that will be used in future parts of this tutorial series.
Basic Blocks
Learn how to create your very first basic blocks that will be used in future parts of this tutorial series.
Data generators
Learn how to use data generators to automatically create your mod assets to avoid having to hand crank them each time.
Loot tables & tags
Learn how to drop one or more items when mining your blocks with loot tables and tags.
Share on social media platforms.
