Basic items | Minecraft 1.19
Published on
10 min read
Part 2 of 5
In this tutorial we will continue off from where we go to in the previous tutorial and add some new basic items to Minecraft. They are “basic” items because they will not have any logic tied to them, we will cover such items later on as part of a “advanced items” tutorial.
What items are we adding?
To make future tutorials easier later on, we will add some items now that we can use later on. Let’s add the following items to our mod and explore what we may want them for later on.
- Coal dust
- Iron dust
- Steel dust
- Steel ingot
We will eventually create a machine in the future that will be used to crush ingots or ore blocks into their dust form, these dusts can then be smelted into ingots and those ingots turned into blocks. We will create a steel dust recipe that is a combination of one iron dust and two coal dust, which can then be smelted into steel ingots. We will explore using the steel ingot to craft steel blocks as you can do with iron ingots in the next tutorial covering basic blocks.
For now we will add these custom items to Minecraft and access them via a new creative mode tab that we will put all of our mod items and blocks under.
Concepts
Each type of item in Minecraft is represented by an instance of the Item class. All variables and methods on your item class are shared by that type of item in general, not specific to each individual item within your inventory. Each stack of items can store unique data, likes it’s durability, on the ItemStack which we will cover in a future tutorial.
There are many things, like items and blocks, in Minecraft that can be registered so that the game knows they exist. There are multiple ways in which you can register these things, however I will show you how to do it using deferred registries that tells the game to automatically create things at the right time. You just set it up, tell it about your items, blocks etc and Forge will automatically register them for you at the right time.
Adding a new item
To create our new item we must first create our items register which we will do by creating a new class. First create a new package in src/main/java/com/github/shaneyu/tutorialmod, same place as the main TutorialMod class and call it ModItems. This is where we will register all of our mod items.
Within this new class we need to create the item register so that we can tell the game about are new items, let’s add the following code to the class:
public static final DeferredRegister<Item> ITEMS = DeferredRegister.create(ForgeRegistries.ITEMS, TutorialMod.MODID);

public static void register(IEventBus eventBus) {
    ITEMS.register(eventBus);
}
Make sure that you import all of the classes you need, Within IntelliJ all unimported classes will be coloured in red and when clicking within them a action bulb will be shown which will help you to add in missing imports. Be sure that you are using Item from net.minecraft.world.item.
You can now register your very first item, the coal dust. Towards the top of the class, after the ITEMS register but before the register method, add the following code. Notice that the property has been marked as static and final, the property name convension is all uppercase characters with underscores to separate words. The first argument for the register method is the item name, this must be all lowercase and unique (none of your other mod items can use the same name). The second argument is a supplier that is used to create the item when the game needs to create it.
public static final RegistryObject<Item> COAL_DUST =
            ITEMS.register("coal_dust", () -> new Item(new Item.Properties()));
To access this item later on from elsewhere in our mod codebase, we can use ModItems.COAL_DUST.get(), this will be the same for all items you register for your mod in this way.
By this point you should have a ModItems class with your first item, the coal dust, registered like so:

This is great, but currently nothing is calling our register method in the ModItems class to actually do the registration with Forge, so let’s fix that now. Open the main mod class file TutorialMod and add the following line into the into the constructor after the line which adds a listener for the commonSetup:
public TutorialMod()
{
    ...
    modEventBus.addListener(this::commonSetup);
    ModItems.register(modEventBus);
    MinecraftForge.EVENT_BUS.register(this);
    ...
}
Your item is now registered, however it doesn’t yet belong to any creative mode tabs and we’ve not as yet given it a texture or added translations; we will cover each one of these next.
Creative mode tab
Create a new Java class in the same items package called ModCreativeModeTabs and add the following code:
@Mod.EventBusSubscriber(modid = TutorialMod.MODID, bus = Mod.EventBusSubscriber.Bus.MOD)
public class ModCreativeModeTabs {
    public static CreativeModeTab TUTORIAL_TAB;

    @SubscribeEvent
    public static void registerCreativeModeTabs(CreativeModeTabEvent.Register event) {
        TUTORIAL_TAB = event.registerCreativeModeTab(new ResourceLocation(TutorialMod.MODID, "tutorialmod_tab"), builder -> builder
                .icon(() -> new ItemStack(ModItems.COAL_DUST.get()))
                .title(Component.translatable("creativemodetab.tutorialmod_tab")));
    }
}
What this is doing, is creating a new CreativeModeTab when the game decides it needs to create and register creative mode tabs, this is done through a registerCreativeModeTabs event as you can see it’s decorated with @Mod.EventBusSubscriber and @SubscribeEvent.
The property TUTORIAL_TAB will be set to an instance of a CreativeModeTab when it has been created by the registerCreativeModeTabs method. You will be able to access this tab throughout the mod code base with ModCreativeModeTabs.TUTORIAL_TAB. You will also notice that we are accessing the coal dust item we created and using that as the tab icon. creativemodetab.tutorial_tab is the translation key we will use later to determine what text to use for the tab’s name/title.
With that done, go back to the main mod class and add the following code into the addCreative method to add all of our items (albeit only the coal dust for now) to the new tab we’ve just created.
if (event.getTab() == ModCreativeModeTabs.TUTORIAL_TAB) {
    ModItems.ITEMS.getEntries().forEach(event::accept);
}
This is taking all items that have been registered by our mod and adding them to the new creative mode tab that we’ve just created. This means that when we add additonal items later on into the ModItems class, we will not need to come back to update this bit of code to add the new items to the tab; it’s all automatic at this point.
Assets
Finally, to ensure that our items can be seen in the game it needs to be given a texture and we also need to setup the translations . Start by going to the project folder src/main/resources and make a new folder called assets and within that folder another folder with the name as your mod id (should be the same as the MODID set in the main mod class file).
Then within that new folder (named as your mod id), create folders called lang, models and textures. In the textures folder, make a new folder called item and within that folder add the coal_dust PNG image that you can find here; this is the texture we will use in the game for the coal dust item.
Now within the models folder, create a new folder called item and within there create a JSON file called coal_dust.json (coal_dust was the unique name we used when we registered the item in our ModItems class, the names mush match for it to work correctly). Within this file, add the following content:
{
  "parent": "minecraft:item/generated",
  "textures": {
    "layer0": "tutorialmod:item/coal_dust"
  }
}
Again, if you look closely we’ve used the item unique name again on the layer0 line and we’ve used our mod id at the start of the same line; once again, I’ll make it very clear that these must match exactly in order to work correctly.
Using the item/generated parent tells Minecraft to automatically generate a item model based on the texture file (just as it does for a iron ingot that is part of the base game). layer0 is the first and, in this case, the only texture to be used and links to the texture png image you added earlier by use of the resource location modid:items/item_name.
Finally let’s add the required translations so we can test the mod and hopefully see the new item in the game. Inside the lang folder, create a new file called en_us.json and add the following content:
{
  "creativemodetab.tutorialmod_tab": "Tutorial Mod",
  "item.tutorialmod.coal_dust": "Coal Dust"
}
This is setting up a translation for the creative mode tab title we created earlier and the new coal dust item. The name en_US.json is the default translation file that you must always provide, but you can provide other translations by adding more JSON files where their name is the language locale.
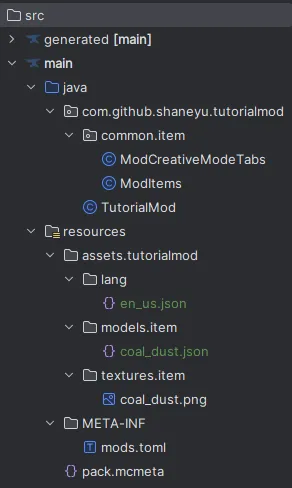
Your final folder structure should look something like this (some folders when empty are collapsed):
Data generators
In a future tutorial we will cover data generation where we can use code to generate the JSON files that we’ve created for our item and will need to do for blocks and more going forward; for a small mod it may be easier to just hand crank the JSON files, however it’s prone to easy human errors and quite frankly I love automating everything that I can. (Yep, I’m lazy!)
Run the game
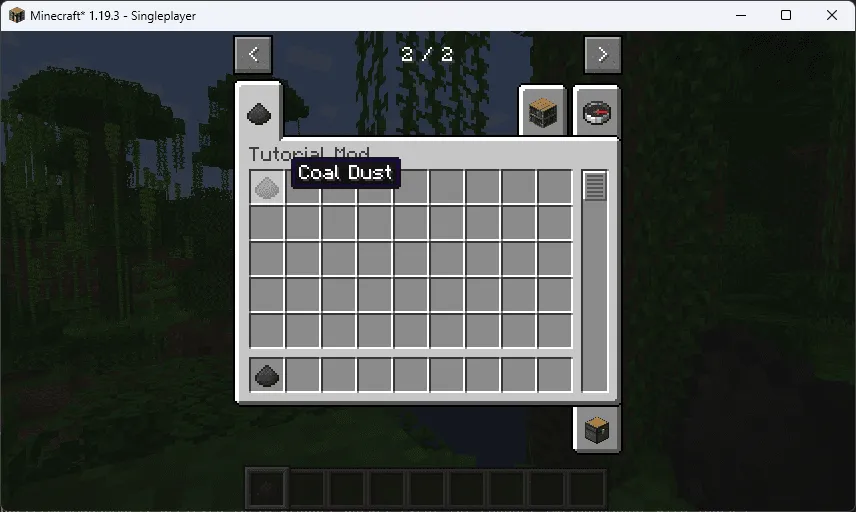
Now, just like we did in the previous tutorial, run the game and wait for it to load. This time, create a new creative mode world and check to see if your new item has been added to a new creative mode tab called Tutorial Mod.
You should be able to give your self the item, throw it on the floor and pick it up; it should be fully textured like any other item and when you hover over it in the inventory it has the translation(s) we gave it.
Using what we’ve learned
Now that we’ve added a new basic items to the game, lets go ahead and use what has been learned to create the iron dust, steel dust and steel ingot items as mentioned previously.
To add these items you need to first register some new items with the following:
public static final RegistryObject<Item> IRON_DUST =
        ITEMS.register("iron_dust", () -> new Item(new Item.Properties()));

public static final RegistryObject<Item> STEEL_DUST =
        ITEMS.register("steel_dust", () -> new Item(new Item.Properties()));

public static final RegistryObject<Item> STEEL_INGOT =
        ITEMS.register("steel_ingot", () -> new Item(new Item.Properties()));
Then add the textures for each one, you can get them from here:
Then add a models/item JSON for each one:
{
  "parent": "minecraft:item/generated",
  "textures": {
    "layer0": "tutorialmod:item/iron_dust"
  }
}{
"parent": "minecraft:item/generated",
"textures": {
"layer0": "tutorialmod:item/steel_dust"
}
}{
"parent": "minecraft:item/generated",
"textures": {
"layer0": "tutorialmod:item/steel_ingot"
}
}Finally, add the translations for each one:
"item.tutorialmod.iron_dust": "Iron Dust",
"item.tutorialmod.steel_dust": "Steel Dust",
"item.tutorialmod.steel_ingot": "Steel Ingot"
Take note of the steel ingot and how it’s naming everywhere contains _ingot opposed to _dust.
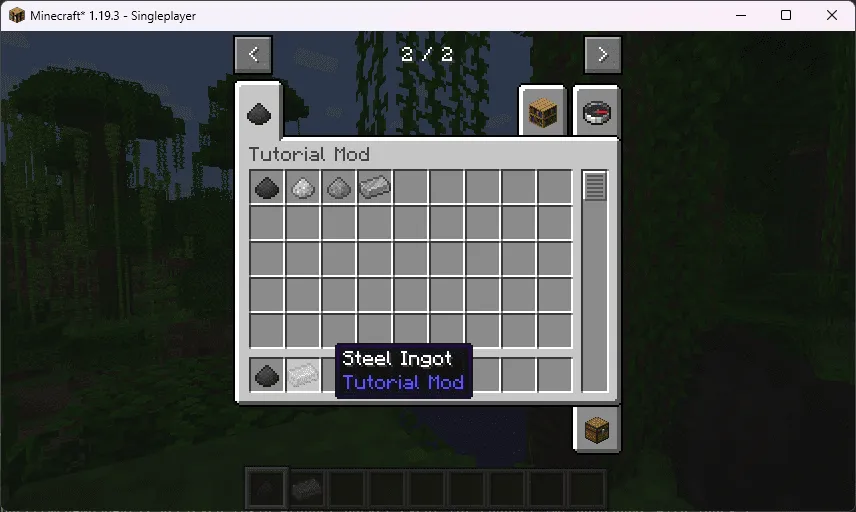
If you have done this correctly, you should be able to play the game and now see all four basic items under our tutorial mod creative tab.
You can see the final state of the mod, as of the end of this tutorial, by going to my GitHub repository.
Parts in this series
Below are all of the other parts of this tutorial series.
Workspace setup
Learn how to setup your workspace for your new Minecraft 1.19 mod, using Forge, Java 17 and IntelliJ community.
Basic items
Learn how to create your very first basic items that will be used in future parts of this tutorial series.
Basic Blocks
Learn how to create your very first basic blocks that will be used in future parts of this tutorial series.
Data generators
Learn how to use data generators to automatically create your mod assets to avoid having to hand crank them each time.
Loot tables & tags
Learn how to drop one or more items when mining your blocks with loot tables and tags.
Share on social media platforms.
